Containers offer a great way to package your code and deploy it consistently and reliably, but not always without complexity.
The infrastructure to deploy your containers still needs to be configured, managed, and maintained. Many times this is
done with orchestration platforms like Kubernetes or Docker Swarm, but these offer their own levels of complexity and
maintenance. The need to manage and maintain hosts or an orchestration platform is not always necessary or desirable.
That’s where Azure Container
Instances fits in. It offers an easy and lightweight mechanism for deploying containers
in a single command. My goal with the following post is to take that easy and lightweight container platform and,
in the words of Donovan Brown, “rub a little DevOps on it.”
In this two part series, I will demonstrate how to take a simple NodeJS application that talks to CosmosDB, and using
VSTS, build a Docker image for that application from the Github repository, publish that image to Azure Container Registry, and then deploy a container based on that image to Azure Container Instances.
By putting this pipeline in place, developers can go from coding locally to having a live application running in Azure in a matter of minutes.
Explain the Code (ETC)
I am trying something new with some Explain the Code or ETC blocks. I’ve many times read blogs and tutorials and done things
without really understanding what I’m writing. My hope is these sections will provide better clarity. They’ll be just
highlighted areas of text that start with “ETC:”
ETC: some code writing here (explanation in parenthesis)
Getting Setup
There are a few things you’ll need for this project:
- Azure Account – Go here to get a FREE $200 trial https://azure.microsoft.com/en-us/free/
- Github Account – https://github.com/join?source=header-home
- VSTS Account (Visual Studio Team Services) – FREE private repositories, build and release pipelines,
and work item tracking. https://www.visualstudio.com/team-services/- If you have an active Microsoft Account (Outlook.com, Live, Hotmail) you can create a free VSTS Subscription. One of the great benefits of VSTS is you get free private repositories, which is something you have to pay
for on Github
- If you have an active Microsoft Account (Outlook.com, Live, Hotmail) you can create a free VSTS Subscription. One of the great benefits of VSTS is you get free private repositories, which is something you have to pay
- Visual Studio Code (Optional) – FREE IDE that runs on all major platforms – https://code.visualstudio.com/download
- Node.js configured
- Express Generator Installed (you can install this via npm install
express-generator -g) - Git
- Docker Community Edition (FREE)
Code Snippets
Throughout this article there are various code snippets. Some of them can be ran as is, but others need minor changes in order to point to your resources as opposed to mine. Look out for sections in the snippets in curly braces {}. {Make sure to edit the values inside the curly braces}.
Creating the Repository
Even though we’ll be using VSTS to create our build pipeline, we’ll be using Github as our source code repository. While VSTS has a wide array of features including Work Item Tracking, Git Source Control, Load Testing, and of course Build & Release management, it is also very open and flexible. You can create an entire build and release pipeline leveraging source code in Github or some other repository and deploy it to a Linux machine running in your data center.
For this project we’ll be using a simple Node Todo sample app that talks to Azure CosmosDB, a globally distributed document database.
NOTE: If you have an existing Node app that you’d rather use, feel free. The only things you’ll need is the installCli.sh script and a valid .Dockerfile. Then skip to the Create Azure Container Registry section.
- Login to Github and Navigate to the tutorial page: https://github.com/Azure-Samples/documentdb-node-todo-app
- Fork the repository to your Github account
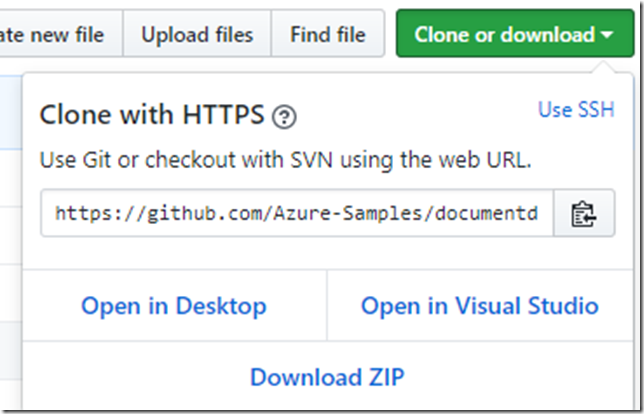
- Navigate to the newly forked repository and copy the Clone URL
- In your terminal navigate to the folder where you would like to Clone the repository
- Clone the repo locally
$ git clone git@github.com:{name of your git account}/documentdb-node-todo-app.git "NodeTodoApp"
Now you should have a local copy of the application to start working with!
Creating a CosmosDB Account
We’ll need a CosmosDB account to use as the backend data store for our application. Considering our docs outline how to create a CosmosDB account and copy the keys, I’m just going to link to this article.
You only need to complete the “Create database account” section.
https://docs.microsoft.com/en-us/azure/cosmos-db/create-documentdb-nodejs
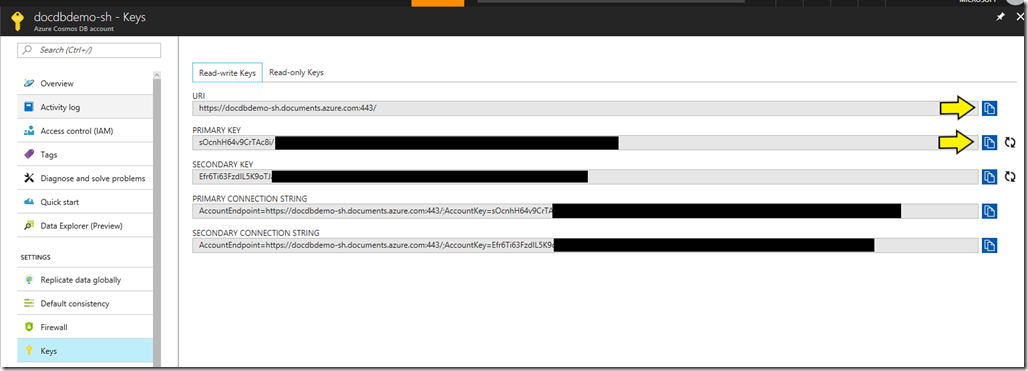
After you’ve created your account, copy the URL and one of the Keys.
Configure Node Application
In this section we’ll get the Node application up and running and push the updates out to our Git repository.
-
- Open the app folder in VS Code
- Navigate to /src/config.js
- Paste your CosmosDB URI and Auth Key as the value for the config.host and config.authKey properties respectively
- Navigate to the /src directory and run “npm install” in the terminal
- From the same directory run npm start
- In your browser navigate to http://127.0.0.1:3000/
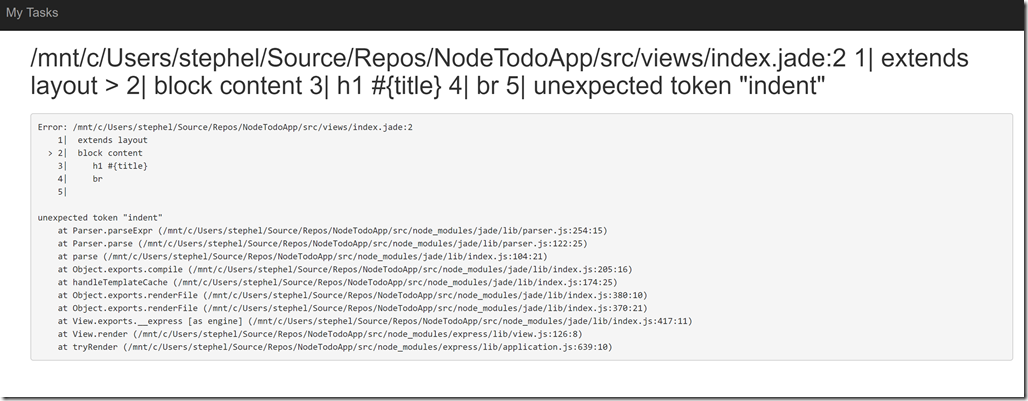
NOTE: At the time of writing this there is an
issue in the Jade template for this project.
There is a pull request pending approval to
fix this issue, but in the mean time you’ll need
to manually fix the template code in index.jade.
Fix Node App
- Open index.jade in the /Views folder
- Copy the code below and paste over the code in index.jade
extends layout
block content
  h1 #{title}
  br

  form(action="/completetask", method="post")
    table.table.table-striped.table-bordered
      tr
        td Name
        td Category
        td Date
        td Complete
      if (typeof tasks === "undefined")
        tr
          td
      else
        each task in tasks
          tr
            td #{task.name}
            td #{task.category}
            - var date  = new Date(task.date);
            - var day   = date.getDate();
            - var month = date.getMonth() + 1;
            - var year  = date.getFullYear();
            td #{month + "/" + day + "/" + year}
            td
              input(type="checkbox", name="#{task.id}", value="#{!task.completed}", checked=task.completed)
    button.btn.btn-primary(type="submit") Update tasks
  hr
  form.well(action="/addtask", method="post")
    .form-group
      label(for="name") Item Name:
      input.form-control(name="name", type="textbox")
    .form-group
      label(for="category") Item Category:
      input.form-control(name="category", type="textbox")
    br
    button.btn(type="submit") Add item
- Save and run “npm start” if the application has been stopped
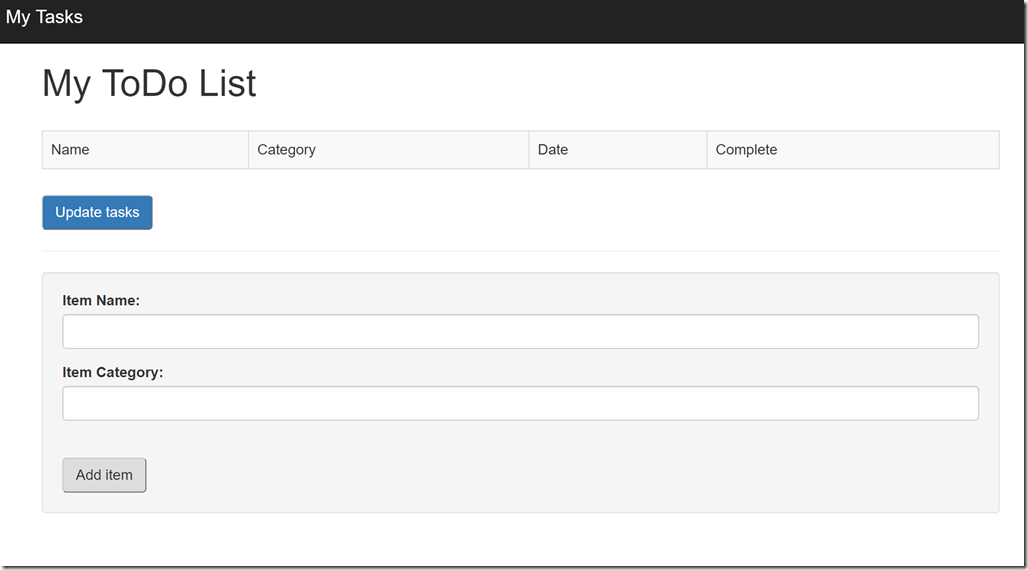
- You should now see a page that looks similar to this
Feel free to add a few items to the Todo List. You should be able to navigate to the document explorer for the CosmosDB collection
and see them.
http://images.stephenhelwig.me/blogimages/2017/08/NodeTodoDemo.mp4
Adding Docker files
Eventually our Docker build and publish will occur in VSTS, but firstly we’ll need to add a Dockerfile to our project and test our building our image. I’ll show two ways to add the Dockerfile and dockerignore file. The Dockerfile informs Docker
how to build your image, while the dockerignore file tells Docker which files are not needed as part of the build.
Use VSCode Command Palette
- In VS Code type Ctrl+Shift+P (or go to View > Command Palette)
- Type Docker and select “Add Docker files to workspace”
- Select Node.js
- Hit Enter to set port as 3000
- 4 files will be generated
- .dockerignore
- Dockerfile
- docker-compose.debug.yml
- docker-compose.yml
- Delete both files with the extension *.yml
- Copy the .dockerignore and Dockerfile into the /src directory
Manually Create Docker files
- In the /src directory create a file named Dockerfile
- Copy and paste the following text into that file
FROM node:6-alpine
ENV NODE_ENV production
WORKDIR /usr/src/app
COPY ["package.json", "npm-shrinkwrap.json*", "./"]
RUN npm install --production --silent && mv node_modules ../
COPY . .
EXPOSE 3000
CMD npm start
- Next create a .dockerignore file in the /src directory
- Copy and paste the following text into that file
node_modules
npm-debug.log
Dockerfile*
docker-compose*
.dockerignore
.git
.gitignore
README.md
LICENSE
.vscode
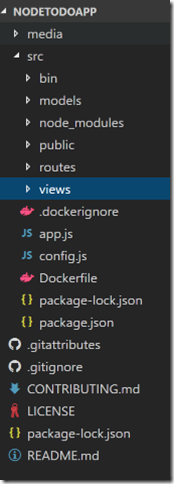
You should now have a directory structure that looks like this:
Add Shell Script to install Azure CLI
When we finally deploy our application to VSTS we will be using the Linux Hosted Agent to run an Azure CLI command. Unfortunately,
the Azure CLI is not installed by default on this agent, so we need to execute a bash statement to install the CLI so we can run our commands.
- Create a .sh file in the root folder of your application. I named mine “installCli.sh”
- Paste the following code into the file
#!/bin/bash
echo "deb [arch=amd64] https://packages.microsoft.com/repos/azure-cli/ wheezy main" | \
     sudo tee /etc/apt/sources.list.d/azure-cli.list
sudo apt-key adv --keyserver packages.microsoft.com --recv-keys 417A0893
sudo apt-get install apt-transport-https
sudo apt-get update && sudo apt-get install azure-cli
Test Docker build locally
Prior to trying to build our image in VSTS, it’s a good idea to validate that the image will build and work. To do this we’ll need Docker CE installed locally and have to run a few commands.
Configure Docker for Windows
- Make sure the Docker daemon is running. You should see this in the systray if you’re on Windows:

- Also double check that it’s set to build Linux containers
- Right click on the icon in the systray and make sure it says “Switch to Windows Containers…”, this means
Linux container build is active
- Right click on the icon in the systray and make sure it says “Switch to Windows Containers…”, this means
To be able to run Docker commands from Bash on Windows, you’ll need to do the following configuration
- Right click on the Docker icon in the systray
- Click on “Settings”
- Under “General” make sure the “Expose daemon on tcp://localhost2375 without TLS” is checked

- Open Bash and run the following command
export DOCKER_HOST=0.0.0.0:2375
Build and Test Image
Run a similar command to the following
docker build -f src/Dockerfile -t {name of your image}:latest src
ETC: docker build –f src/Dockerfile (location of the Dockerfile) –t (name of image): latest (version of image) src (folder location of app)
- After the build completes run “docker images” and verify that the image “nodetodoapp” exists
- Run the image using the following command
docker run -p 4000:3000 nodetodoapp
ETC: docker run –p (port) 4000 (port docker exposes) : 3000 (port app exposes) nodetodoapp (name of image)
- Navigate to http://localhost:4000 and you should see your Todo app.
- Add and complete a couple tasks and verify that you see them in Cosmos DB
- Lastly, push your changes to your Git repository
In the next post we’ll get into Azure and VSTS and create our Build Process to deploy our code.
